 |
| click image to see full size |
This is one of those rare images where I had a design in mind from the beginning and attempted to execute it. I wanted to have a wavy, bright blue image of the singer superimposed over the original photo, like an old TV with bad reception.
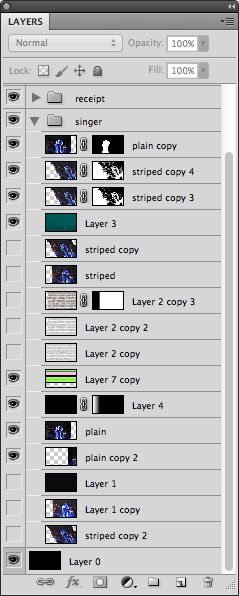 |
| You can see the trial and error process in my Photoshop layers. |
First, I copied the singer photo layer and used the Artistic > Cutout filter to reduce the detail. Image > Adjustments > Posterize will do this, too, but the Cutout filter also simplifies the edges of shapes.
To create the irregular stripes, I filled a layer with a plain horizontal striped pattern, then used the technique described in my distressed type tutorial. I merged the jagged stripes with a copy of the singer's photo and used the Distort > Wave filter to make it wavy (I put the horizontal setting at 1% to get waves that only went up and down). Edit > Skew let me adjust the angle of the image. I then selected all the black areas with the Magic Wand and made a layer mask from the selection.
That gave me the basics of what I was looking for, but it didn't interact with the background photo the way I wanted it to. So I loaded the layer mask as a selection, then expanded and feathered it (actually, I think I had to use Select > Contract to get the selection I wanted even though that doesn't make any sense). I then copied the wavy blue layer and used my modified selection as a new layer mask. This created stripes with more space between them.
With the original wavy image layer on top of the one with the modified selection, I gave the top wavy image a blend mode of Multiply and the bottom one a blend mode of Hard Mix.
If you're curious about any of the other components of the picture, just ask and I'll do my best to answer.
No comments:
Post a Comment